 LZ1BAB Добре дошли в страницата на LZ1BAB
** image has been updated as of 21/04/2018 to resolve the problems some people had booting their Pi **
This post is an updated version of the original article I wrote in February 2017. It’s using Raspbian Stretch rather than Raspbian Jessie, has Direwolf 1.4 instead of Direwolf 1.3 and the method used to start the gateway has changed. Direwolf is now running as a service and can be easily started, stopped, restarted, enabled or disabled through simple commands. It has been tested on a Raspberry Pi Zero, a Pi Zero W, a Pi 2B, a Pi 3B and the latest Raspberry Pi 3B+. It will not work on a Pi3A+ or a Pi4. You now only need to edit one file to get a working gateway unless you want to select a different frequency from 144.800MHz, then you’ll need make an additional edit.
The instructions are very similar to my previous post except the process of automatically starting Direwolf which has been simplified. Even if you are familiar with the previous image, please ensure you read the entire article, especially if you need to change the frequency as the file structure has changed.
The entire process detailed here should take less than half an hour to complete.
You will only need to edit one or perhaps two files.
First, download my custom built Raspberry Pi image from here (the filename is aprs-igate-stretch.img) or preferably as a torrent from here. This is a 2.2Gb file which will expand to approximately 8Gb when you decompress it. If you struggle to unzip the file then you can download the full uncompressed image using this torrent. Unzip it and write it to an SD card. The image was created using an 8Gb SD card but I recommend you use a 16Gb card in your Raspberry Pi. 4Gb cards are practically impossible to find these days and 8Gb cards are going the same way. I’ve found SanDisk Ultra 16Gb cards to be about the best when it comes to performance and price and they can be picked up for about £8. This image is fully up to date as of 21st April 2018.
There are two methods of downloading the Raspberry Pi image. The first is direct from SourceForge (aprs-igate-stretch.img) and the second is as a torrent. If you use the torrent method, please seed the file for as long as possible because the more people who seed, the quicker the download will be for others.
Thank you.
If you are having problems unzipping the file, you can download the uncompressed image (just under 8Gb) using this torrent.
MD5 of aprs-igate-stretch.zip is f8469173f3e3d9c420dbaefaff7d9875
MD5 of aprs-igate-stretch.img is 22998d62e7dd1b3f270834f6bfd5f089
If you get a CRC error when trying to unzip the downloaded file, first check the MD5 to make sure it’s correct. Assuming it is, then you should use a third party tool such as WinRAR to extract the image from the .zip file.
I have successfully decompressed this file using Windows XP, Windows 7, Windows 8, Windows 8.1, Windows 10, MacOS and Ubuntu.
*** NOTE as of October 2019 – Recent versions of WinRAR are struggling to decompress the image, if you are having problems, please use 7-Zip *** or use this torrent which is the full 8Gb image file, uncompressed.
Connect your RTL-SDR dongle and a network cable to your Raspberry Pi and boot it. I thoroughly recommend you use a dongle with TCXO as it won’t drift in frequency and you shouldn’t need to do any frequency calibration. I’m using an RTL-SDR R820T2 RTL2832U 1PPM TCXO SMA Software Defined Radio (Dongle Only) device which is the latest model, complete with TCXO. Other dongles are available such as this NooElec version from Amazon which is a little cheaper and will arrive quicker or you can search eBay for similar dongles.
These instructions are written to do everything from a command line. If you plug in a monitor, mouse and keyboard and boot to the Graphical User Interface (GUI), you will see an icon on the desktop called Dire Wolf. DO NOT click on this icon, it does not start Direwolf. You’ll get an error message telling you it can’t open an audio device.
You will need to know what IP address your Raspberry Pi has on the network. I do this by looking at my router and checking what devices have connected and then set up a DHCP reservation so each particular Raspberry Pi I own will always have the same address each time it reboots.
Open up a terminal/dos prompt or whatever client software you’re going to use to connect to the Raspberry Pi and log in. In my case, the Raspberry Pi is on 192.168.1.144 so I use the command
ssh pi@192.168.1.144
You’ll be prompted for a password – It’s currently set to raspberry.
Use the following command to enter the Raspberry Pi config utility:
sudo raspi-config
It’s very important to expand the filesystem – You do this by selecting option 7 Advanced Options, then A1 Expand Filesystem, then select OK and you’ll be returned to the main screen.
Now select the first option Change User Password and press enter. Press enter again and you will be prompted to Enter new UNIX password. Type a new password, press enter and re-type your new password again. You will get a message telling you your password has been changed successfully.
Use the arrow keys again to move down to 4 Localisation Options and press enter. Use the arrow keys again to select Change Timezone and press enter. First select your Geographical area and press enter and then select your Time zone and press enter.
Now you should set your Wi-Fi country – By default, this image is set to GB (Great Britain) so if you’re in a different country you should change this to ensure that the Pi uses the correct frequencies. Select 4 Localisation Options and press enter. Scroll down to I4 Change Wi-fi Country and press enter. Find your country, press enter and then press enter again to return to the main screen.
Finally, select 2 Network Options and press enter. Press enter again on N1 Hostname and give your Raspberry Pi a suitable name.
You will now be returned to the main Raspberry Pi Software Configuration Tool main screen. Use the tab key to select <Finish> and press enter. You will be asked if you would like to reboot now. Press enter to reboot and once your Pi has rebooted, log back in using the new password you set earlier. Make a note of this password because if you forget it, you’ll need to start from scratch.
You will need an APRS passcode so use the APRS Passcode Generator at Magicbug to generate one.
All the software has been pre installed, all you need to do is edit one (or possibly two) files.
cd ~
sudo nano -c sdr.conf
Scroll down to line eight and change the xxx to your callsign and required SSID. I use -10 as my SSID so this line reads MYCALL G6NHU-10. Please use your own callsign, mine is just shown as an example.
In the section below, edit the line starting with IGSERVER to be the correct one for your region. I’m in Europe so my line reads IGSERVER euro.aprs2.net
Scroll further down and you’ll find a line that starts with IGLOGIN. Change the xxx to be the same as the callsign you entered above (including SSID) and then change the numbers 123456 to the passcode you obtained from the APRS Passcode Generator.
At the bottom of that file there is one long line that starts with PBEACON. Replace xx.xxxxxx with your latitude, yyy.yyyyyy with your longitude and zz with your callsign (including SSID).
Save the file by pressing ctrl-x, then hit the Y key and then press enter.
You can now perfom a test using the following command
(144.800 is the APRS frequency in the UK, change as required).
rtl_fm -f 144.80M - | direwolf -c sdr.conf -r 24000 -D 1 -
If all is well, you should see something like this.
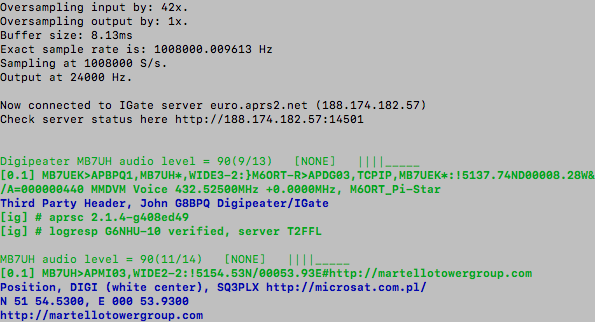
Initial test of the RPi and RTL-SDR Dongle APRS RX only iGate using Raspbian Stretch
Press ctrl-c to exit the test.
If you’re using a Mac and connecting to your Raspberry Pi via the terminal you may notice the screen flashes badly. You can fix this easily and quickly by going into the terminal Preferences/Profiles and make sure the box “Allow blinking text” is not ticked.
*** IF YOU GET AN ERROR WHEN RUNNING THE TEST ***
On some Raspberry Pis, you may get an error when you try and run the initial test. There are two possible errors, the first is:
Signal caught, exiting!
User cancel, exiting…
Illegal instruction
The second error which has been spotted in testing is:
Dire Wolf version 1.4
No supported devices found
Illegal instruction
Either error can be resolved by redownloading and compiling Direwolf using these commands (copy and paste them one at a time exactly as written below:
cd ~
sudo cp sdr.conf sdr.old
sudo rm -r direwolf
git clone https://www.github.com/wb2osz/direwolf
cd ~/direwolf
make
sudo make install
make install-rpi
make install-conf
cd ~
sudo mv sdr.old sdr.conf
Now reboot your Raspberry Pi and run the test again.
You may find that rtl_fm doesn’t report that it’s tuned to exactly the correct frequency, this is nothing to worry about because the RTL-SDR works by mixing the incoming RF with a local oscillator and then IQ sampling the resulting base-band (difference) signal. The local oscillator therefore needs to be offset a little so that the wanted signal doesn’t fall at the 0Hz point. rtl_fm automatically selects an appropriate offset for the chosen sampling rate and displays the resulting “offset oscillator” frequency, not the actual “tuned” frequency.
If your local APRS frequency is NOT 144.800MHz then you will need to edit an additional file.
sudo nano /usr/local/bin/dw.sh
You’re looking for this line.
Change 144.80M to whatever your local APRS frequency is.
Save the file by pressing ctrl-x, then hit the Y key and then press enter.
Direwolf is already installed as a service so you must enable it by typing the following command
sudo systemctl enable direwolf
With the service enabled, you have more commands to use
This starts the service
sudo systemctl start direwolf
This command stops the service
sudo systemctl stop direwolf
If you want to disable the service so it doesn’t start automatically on reboot, use this command
sudo systemctl disable direwolf
This very useful command will show the status of the service and see the last few lines of output to demonstrate that it’s all running correctly.
sudo systemctl status direwolf

Sample of the output from running sudo systemctl status direwolf
There is an even more useful command which you can run either via SSH in a terminal window or when you’re logged onto the Raspberry Pi via the GUI which will give you a constantly updating display of the stations heard. This command is
sudo journalctl -o cat -af -u direwolf
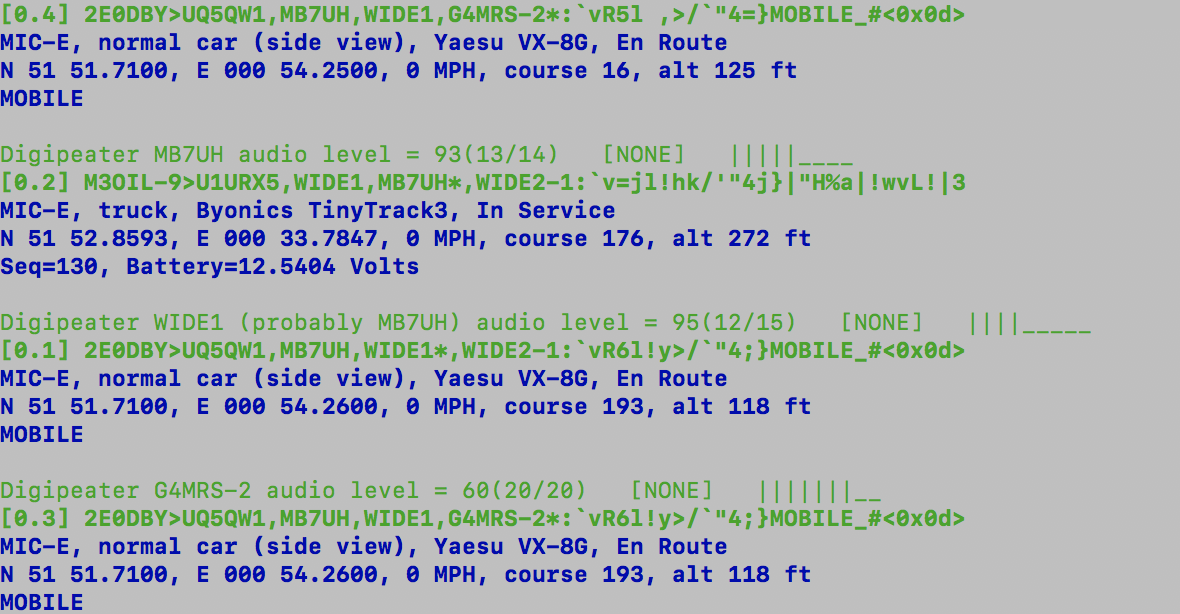
Output from sudo journalctl -o cat -af -u direwolf
(press ctrl-c to stop the display)
After enabling the service, reboot your Raspberry Pi and once it’s restarted, it will automatically connect to the APRS network and operate as a receive only iGate. There is an enforced two minute delay from the Pi starting to the gateway connecting, this is to allow all the system services to start up. Nothing will be echoed to the display while it’s running like this so you can check your status on aprs.fi by searching for the callsign you entered (including SSID). You don’t even need to log into the Raspberry Pi, the gateway will start automatically within about two and a half minutes from rebooting.
It’s been mentioned that you might like to calibrate the frequency of your RTL-SDR dongle. I didn’t and I didn’t notice any performance issues but it’s likely that if you’re using an older or cheaper dongle then it might be a little off frequency. If you’d like to do this, it’s very straightforward to do requiring that you edit just one file. I’ve written some instructions which you can see by clicking here.
Please note – I am not claiming originality for this setup method, I’ve simply followed what’s already available out there on the internet and created an image based on those instructions for your convenience. My two source documents were Raspberry Pi SDR IGate and Raspberry Pi Packet TNC. I thoroughly recommend you familiarise yourself with both of them to see what’s been done here. You can also read my previous blog article where I list each command I used to create this image. It’s also worth downloading the full Dire Wolf user guide. I learned how to add the service by reading a post from Josh, VK2HFF on the Direwolf Yahoo reflector.
I hope this image is useful and as always, I’d appreciate any feedback, comments or thoughts below.
Addendum
On the 25th April 2018 a massive thunderstorm passed overhead here and caused the Raspberry Pi Zero which runs my APRS iGate (MB7UIV) to crash. It had ben running flawlessly without a reboot for nearly three hundred days. I decided to rebuild it using the method above and the total time it took, including writing the SD card and reinstalling Direwolf using the instructions provided was around forty minutes.